This is part 2 in my home lab blog series.
Part 1.
After having selected hardware for my home lab (Apple Mac Mini) I started to deploy virtual machines.
As I had (unfortunately) expected the internal 5400 RPM drive with 1 TB capacity ran OK with 1-2 VMs, but it was almost impossible to even complete a guest OS installation for the third VM.
A quick screenshot of the read and write latencies on the local datastore where there is no activity and I then reboot a single Windows Server 2012 VM:
As you can see there are peaks beyond 500 ms! Obviously this is going to be a problem!
Luckily I have been selected by PernixData for their PernixPro program:
“PernixPro™ members are an elite community of IT professionals committed to advancing FVP storage acceleration technology.
By facilitating collaboration between PernixData experts and the industry’s top luminaries, PernixPro breaks down the barriers to widespread adoption of server-side storage, giving companies of all sizes a cost-effective solution for scaling storage performance independent of storage capacity.”
As you may remember from part 1, I have already installed an Intel S3700 solid-state drive in the host, this was purchased to be used with PernixData FVP.
Let’s take a look at the deployment of FVP in my environment.
First of all, I need a FVP Management Server.
Since this is a home lab and I only have limited resources available I decided to try with low hardware assignments: 1 vCPU and 2 GB memory.
While this works with any notable issues for me, I do often see CPU spikes and for a production system you really do need to assign more CPU and memory.
Screenshot walk-through of installation process (FVP Management Server):
Note:
The account specified here connects from FVP Management Server to VMware vCenter.
If this is not an Active Directory or local Windows account, then obviously it cannot also be used to run the actual FVP Management Server service on this VM, hence we need to mark the “Run PernixData FVP Management Server Service as Local System account”.
Note:
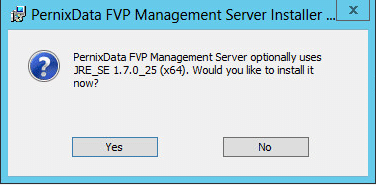
While the window says Java is optional, it actually means if you don’t click Yes then PernixData FVP Management Server will simply not work – Click Yes now J
This completes the Management Server installation.
Next up is opening the vSphere Client and verify that you see one installed PernixData plug-in and one Available PernixData plug-in.
In my case, I did not see them:
Logging onto the FVP Management Server I could see the service was not started:
The problem was the Local System account did not have permissions to access the SQL server database.
To resolve this, I change the Log On from Local System to the local Administrator account (which did have access to the SQL server database):
The service was now able to start (…and continue running):
I can recommend to also verify you have the SQL Server Browser service enabled and started:
Back to the vSphere Client the two plug-ins were now visible:
Now that the Management Server is running, we need to get FVP kernel module installed on each host:
Once the FVP kernel module is installed we are ready to start creating a FVP cluster:
Note:
In a production system, you will most likely NOT want to accelerate any VM located on a local datastore.
However, this is a lab environment and for now I will ONLY be using this one local disk.
PernixData FVP does not by default allow us to select a local disk, so how to fix that?
Pernix CLI to the rescue!
Use command on host: prnxcli <datastore> set forceSATP True
Note:
After this command, you are required to reboot the host before it works.
´
Let us see how it appears to be working:
Nice!
Let me know what you think in the comments below, thank you.


